Zoho SalesIQ and Zoho Bookings Integration
This integration helps visitors schedule appointments quickly and efficiently while having conversations with your chatbot or operator inside the SalesIQ chat window. It’s useful for all business cases with a need for customers to make appointments with the service professionals for their services and facilities (for example: appointments for online training classes, medical appointments, product demo appointments, among others).
Here are the benefits of this integration:
- Your website visitors will be able to schedule their appointments with the required Expert or Specialist in real time, right from the Zoho SalesIQ chat window.
- This integration will remove the need for the customer to go to a different webpage, search for the necessary service or service provider, and then book the appointment manually. This will save a lot of time in the process.
- This integration will cover the Click-to-Book appointment feature in any bot-customer interaction or customer-operator interaction.
- When the appointment is being booked, only the available slots will be listed for booking. This will avoid any confusions.
- Admins can map the required workspace with a brand or brands, according to their requirements.
- Rescheduling or cancelling the appointments is also made easy and can be done from within the chat window.
- When the appointments are booked, cancelled or rescheduled, customers will receive mail confirmations for their reference.
Zoho Invoice: New Advanced Customization Options in Templates
New Templates
Choose from a total of 18 templates available across different categories. For example, the Spreadsheet – Compact template under the Spreadsheet category can be used when sending invoices with more line items like, for example, a grocery list.
Background Images
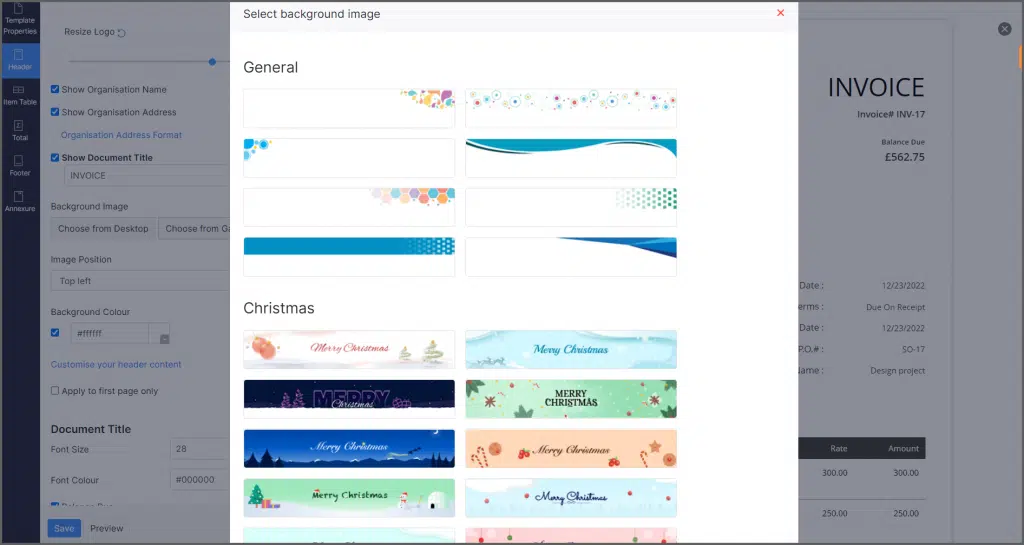
Display an image of your company’s logo or any other relevant images in the background of your invoice PDFs. You can upload a background image or select an image from Zoho Invoice’s gallery of holiday-themed images.
Note: The gallery option is available only in the Header and Footer sections of the invoice.
The gallery consists of ready-to-use header and footer images, as well as special festive- and holiday-themed images that are constantly updated based on occasions.
Use the Image Position dropdown to determine the placement of your image. This option is available in the Header, Body, and Footer sections of your invoices.
Background Color
Add different colors in the Header, Body, and Footer sections of your invoice PDFs.
Note: The two features mentioned above can’t be used simultaneously. You can only add either a background image or a background color to a section of your invoice.
Styling Enhancements
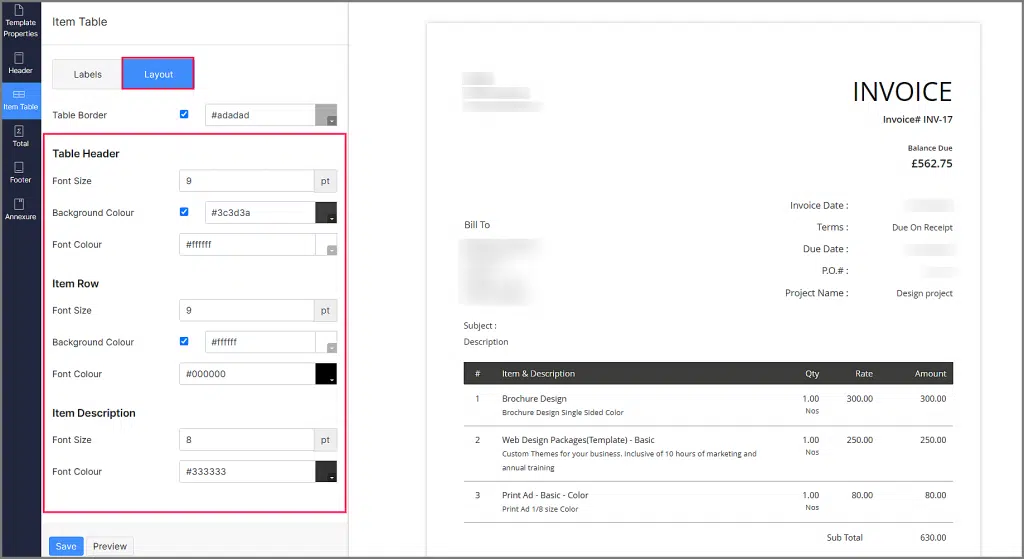
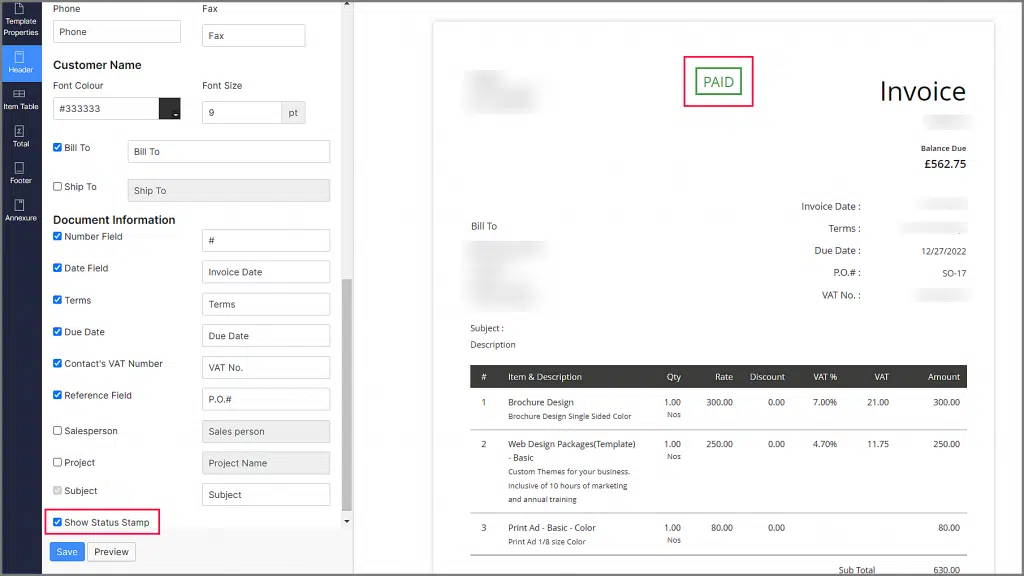
Now you can customize all the text fields displayed and the spaces between them in your invoice PDFs. Use the Layout button to change the font size, font color, and background color of all the text fields displayed on your invoices such as the Billing or Shipping Addresses, Organization Information, Item Table, and more. Additionally, you can adjust the width of each field in the Item Table using the Labels button.
Capture Additional Information
The invoice template settings are now split into subsections to give you greater flexibility over the information displayed on your invoices. Here are some of the improvements:
- Template Properties: Use the Add Attention Content feature to show any important information or a word of warning to your customers.
- Header: Use the Customize your header content option to personalize the content of your header. You can apply these changes to only the first page or all the additional pages of your invoice.
- Mark the Show Status Stamp checkbox to display the status of the invoice on your invoice PDFs. You can display the following statuses: Paid, Draft, Written-Off, Partially Paid, and Void.
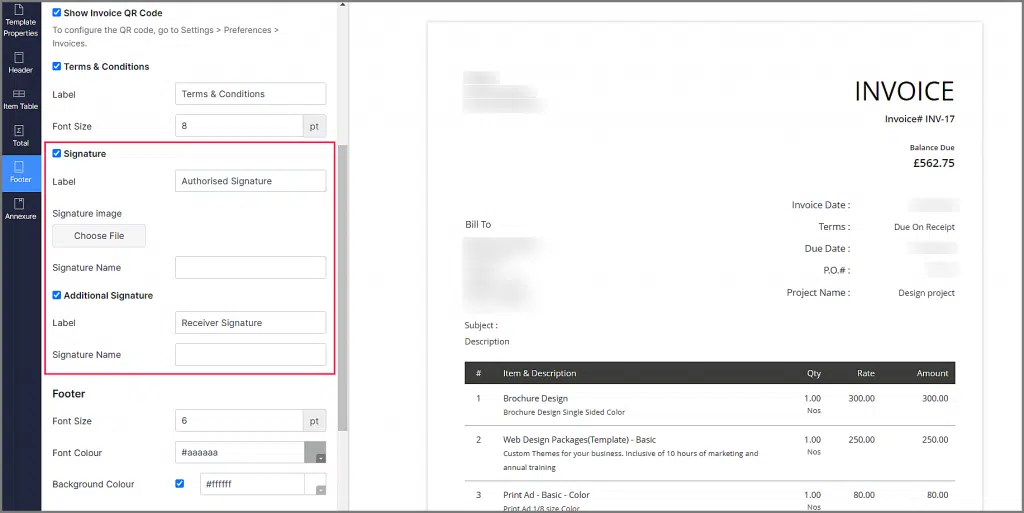
- Footer: You can display a QR code on your invoices that customers can use to scan and pay or view any other information that you configure.With the Customize your footer content option to personalize the content of your footer. You can add your organization’s address or helpline details here. Also, you can use the option Add an additional signature to enable your customers to sign their invoice.
- Annex: You can now display additional information apart from Terms & Conditions. This can include by-laws or any other details about your organization.
Zoho SalesIQ Introduces Click-to-Call
Click-to-Call customer support is a service that allows customers to connect with a support representative by clicking a button on a website. When the button is clicked, a call is initiated between the customer and a representative. This lets customers receive immediate assistance without having to dial a phone number or wait for a response via email or chat. It can also be a handy option for customers who prefer to communicate over the phone or have a more complex issue that may be easier to explain on a call. This feature doesn’t require extensions, hardware set-ups, or phone numbers.
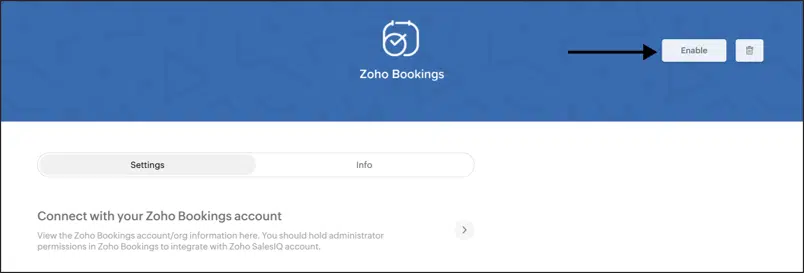
How to Enable Click-to-Call in Zoho SalesIQ
1. On the SalesIQ dashboard, go to Settings > Brands > [Your brand] > Installation > Website.
2. Under Communication Mode, enable the Call option.
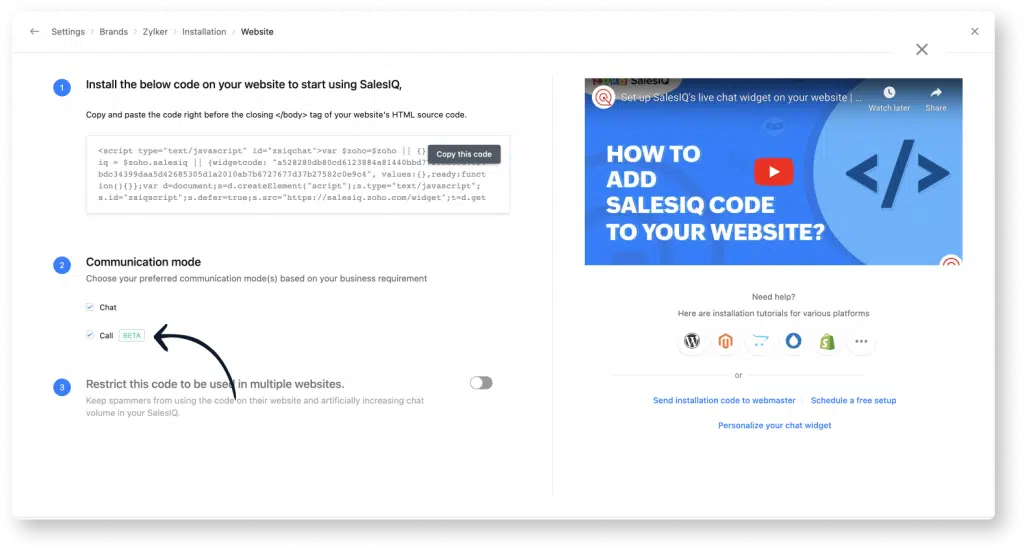
Note: Click-to-Calls and audio calls are supported only for website channel at the moment.
Click-to-Call also gives you the following options:
- Call-Only System
- Call Routing
- Call Queue
- Transferring Calls to Operators
Media Library for Zoho Social
Media Library is a repository of images and GIFs that can be added to your social posts in Zoho Social. Its organization and accessibility make it easy to search for media and upload it. Media Library provides access to platforms such as Pexels, Pixabay, and Giphy. This allows you to search for media using relevant keywords from a vast library in a cloud-based environment.
Social Library, the local file repository on Zoho Social, lets you upload media files to the application and add them to posts easily, as well as for frequent use. Users can upload media files from their local desktop, Media Library, Canva, Zoho WorkDrive, Google Drive, OneDrive, Dropbox, Evernote, and Box.
Note: Media Library for Zoho Social is available to users on Professional, Premium, and Agency plans.
How to Access the Media Library
It can be accessed from different places in Zoho Social like the Posts tab, Messages, and the Monitor tabs.
1. Click on the images icon to attach an image or GIF from Media Library.

2. Search for and select the required media items.
3. Click Attach to add them to the post, post comments, or messages.
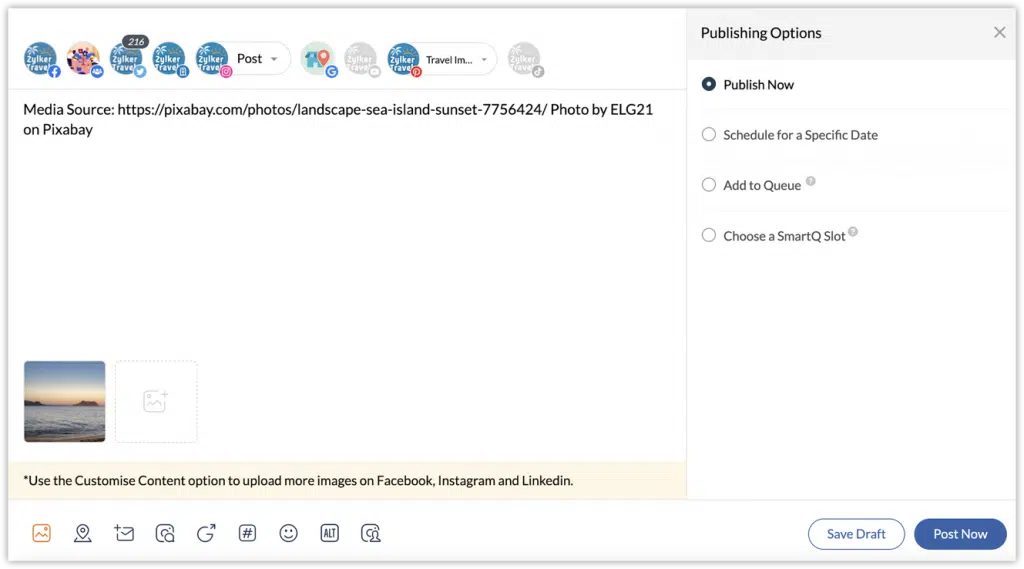
Notes:
- The image source credit is automatically added to the caption of your post in the compose window. This can be edited as required.
- Only one media item can be added to a post comment or message reply.
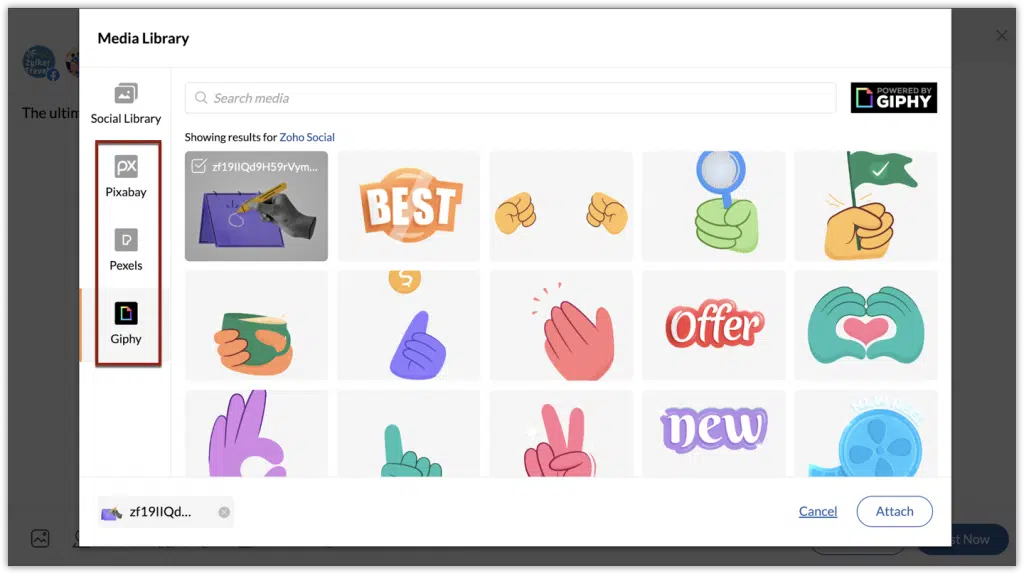
How to Search Using Media Library
1. Click on the images icon.
2. Click Media Library.
3. Click on the library icons for Pexels, Pixabay, and/or Giphy on the left side of the window to access the particular library.
4. Search using a keyword in the search bar to view the media results.
5. Select the required media items you want to attach to the post or comment by clicking on the check box.
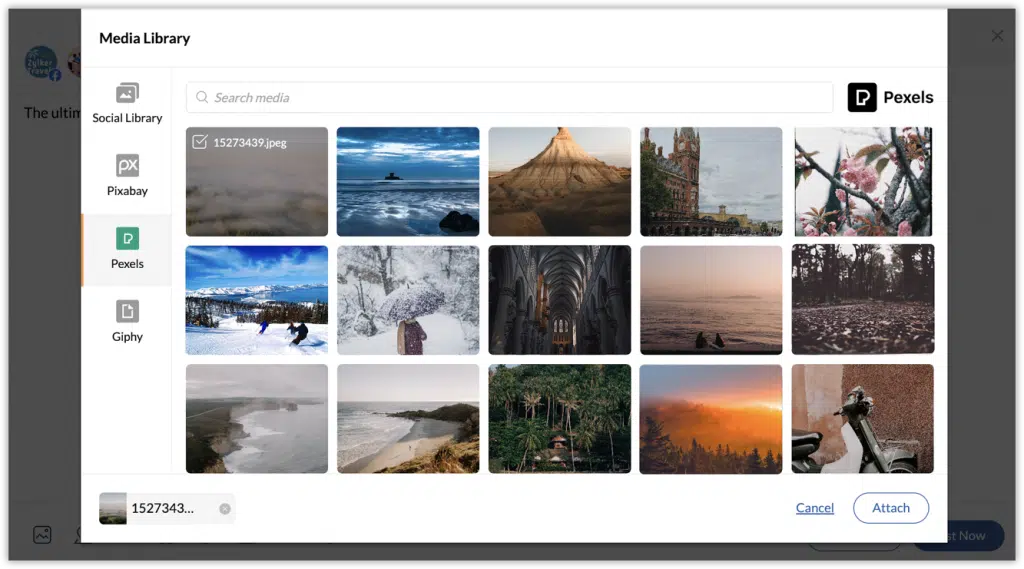
6. Click Attach to add.
How to Upload Media to Social Library
1. Go to the Posts tab.
2. Click Social Library on the left.
3. Click the Upload Media button at the top.
4. Choose Media Library from the drop-down list.

5. Search and select the required media items by clicking on the check box.
6. Click Attach to add them to the Social Library.
Note: Media Library on Zoho Social only supports images and GIFs.
Exporting Posts from Zoho Social
All the scheduled, drafts, unpublished, and posts waiting for approval in Zoho Social can be exported as a CSV file. This helps you share the content calendar with your clients, partners, or stakeholders to provide them the whole picture of the next set of engagements planned for the brand’s social media channels.
You can opt to export all the posts at once or apply different filters based on the channel, type of post, status, author, or scheduled date.
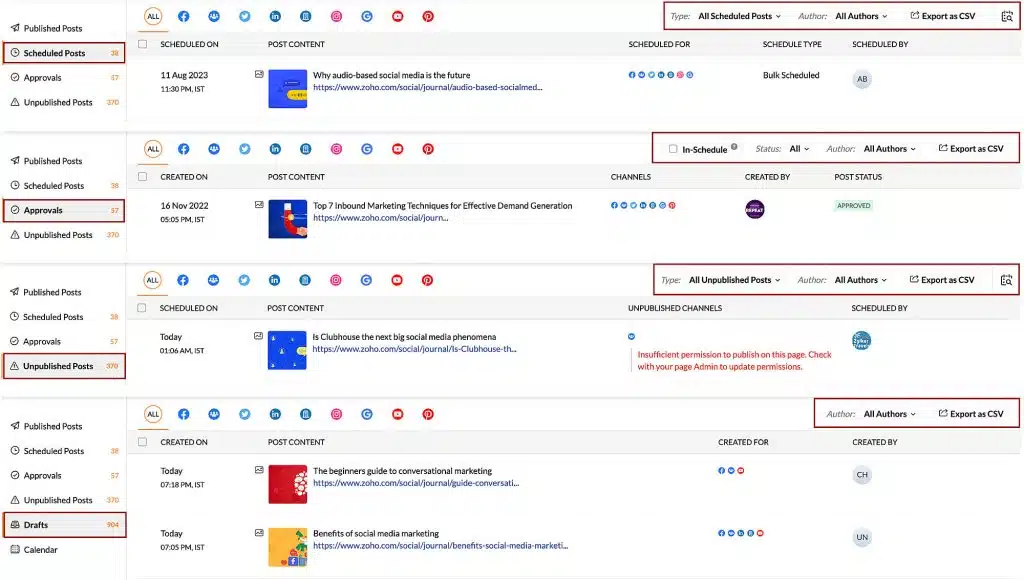
The exported file will contain information such as the scheduled date and time, caption, Google My Business button along with the URL, and media files. This exported file will come in handy when you would like to publish similar post at a different date and time, or for a different brand using Bulk Scheduler.
How to Export Posts
1. Go to the Posts tab.
2. Select the type of post from the left panel.
3. Apply filters such as Channel, Type, Author, and Date, if required.
4. Click Export as CSV.
Resource: Zoho CRM’s RouteIQ for Automatic Sales Route Plans
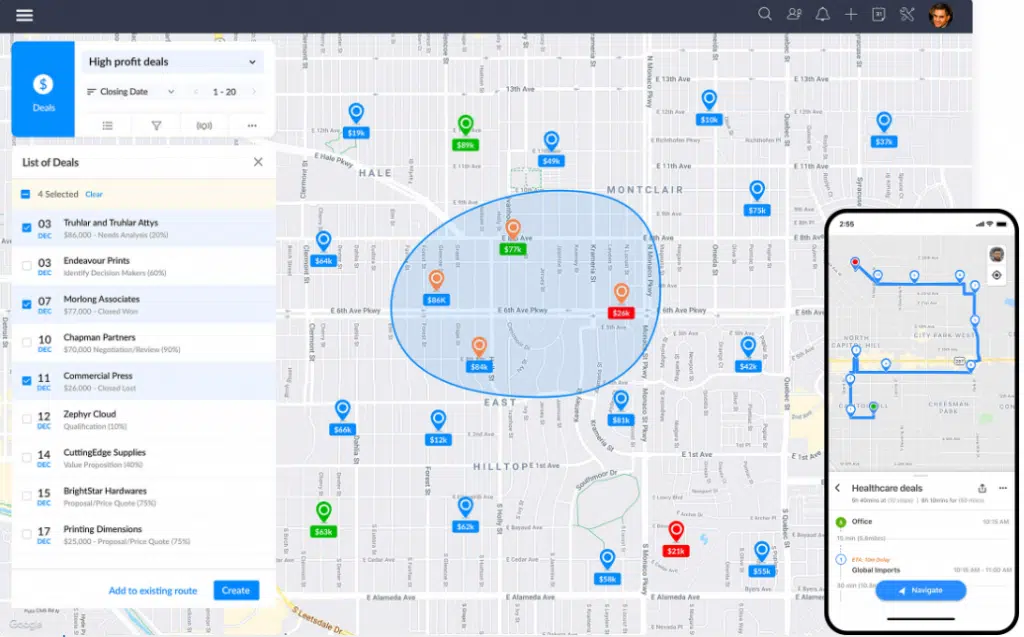
A very handy feature that you can add to your Zoho CRM is RouteIQ. Whether you use it from your smartphone or desktop, it can help you save time and money in your sales routes with the following functions:
- Route: RouteIQ lets you plan a route that is automatically optimized based on the distance, appointments, and drop-ins. If there are any cancellations or new customers to add, you have the option of adjusting the route as you go. Plus, single-click navigation to any customers or any planned routes.
- Map Visualization: Visualize your Zoho CRM leads, deals, contacts, accounts, and events on an interactive map and filter prospects that match your specific criteria. Also, explore your CRM leads, contacts, accounts, deals, and events nearby.
- Map Reports: View a heat map or cluster map of your CRM leads, contacts, accounts, deals, and events.
- Interactive Map Views: A visual alternative to List Views that provides you interactive map views of all your CRM custom list views. As you work in your CRM, you can see where locations in your lists are relative to each other for better planning.
The Zoho RouteIQ app is available for Android and iOS.
Zoho Analytics Webinars
Advanced Analytics for Shopify
Advanced Analytics for Instagram
Advanced Analytics for YouTube
Zoho Named Visionary in the 2023 Gartner® Magic Quadrant™ for Enterprise Low-Code Application Platforms
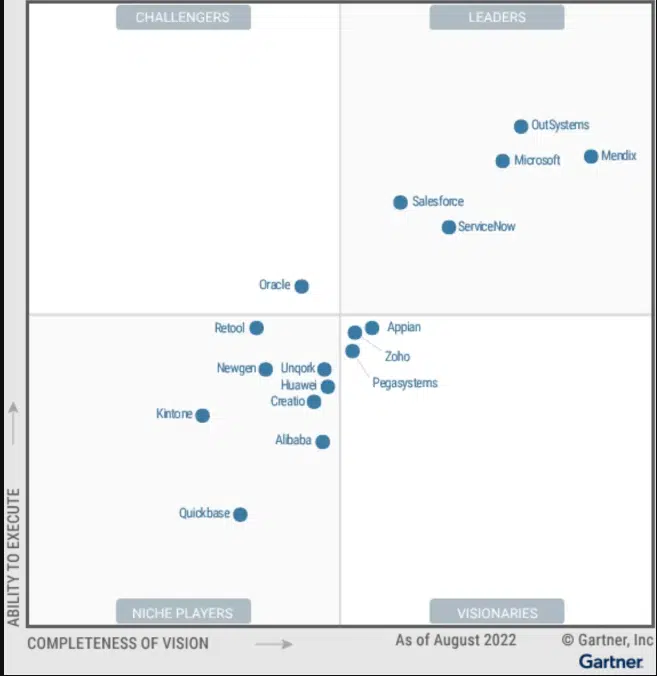
Once again, a Zoho app is recognized by Gartner. This time, Zoho Creator is the recipient for such recognition.
According to Gartner, at its core, the Zoho Creator platform has the goal of democratizing application development by empowering different personas within organizations to build end-to-end business solutions that combine hyper-customized applications with deep contextual integrations and a full-fledged analytics engine.
Zoho Creator is equipped with several enterprise-grade features accessible across the no-code, low-code, and pro-code spectrum. That, along with critical enablers around security, multi-environment development, and AI, encourages greater collaboration between business and IT teams, helps eliminate shadow IT, and allows teams to build scalable and future-proof organizations.
That’s all for now, IC readers! See you soon for more Zoho updates from InterConnecta!
Interested in adding these new features to your Zoho system? We can help! Learn more about our Zoho Consulting Services and ask us for a free consultation.